Agustin N. R. Ramirez

Frontend Engineer

Fix toString error in Elm 0.19

Many initial tutorials of Elm show us how we can display an Integer as String using the util function called toString.

Example

module Main exposing (main)

import Html


add a b =
    a + b


result =
    add 1 2 |> add 3


main =
    Html.text (toString result)

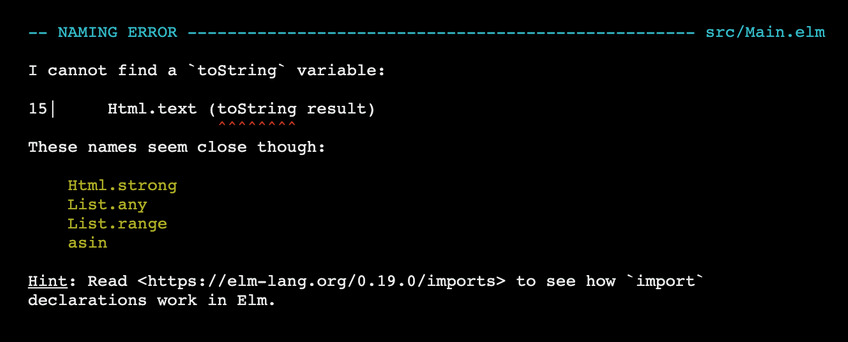
But with the new version, precisely v0.19 this shows an error.

Cannot find a 'toString' variable

To solve this error, simply replace toString with Debug.toString.

module Main exposing (main)

import Html


add a b =
    a + b


result =
    add 1 2 |> add 3


main =
    Html.text (Debug.toString result)

See the upgrade instructions for more information.


docker-compose for postgres with db init script

Single script

postgres:
  image: postgres
  volumes:
    - ./init.sql:/docker-entrypoint-initdb.d/init.sql

Multiple scripts

Multiple scripts run in alphabetical order, thus it's good practice to prefix them with a number.

volumes:
  - ./schema.sql:/docker-entrypoint-initdb.d/1-schema.sql
  - ./data.sql:/docker-entrypoint-initdb.d/2-data.sql

Directory containing scripts

volumes:
  - ./init-scripts:/docker-entrypoint-initdb.d

Testing Frontend applications

We know that testing is hard. Imagine testing a frontend applications 🤯.

So for that, we are going to cover different approaches and review several libraries to test a frontend application.

Static Testing

Use ESLint to detect bugs, e.g. typos, and codebase improvements on build time. Use Typescript to detect type bugs on build time.

    uploader.tsx
        44:2    error     Expected '===' and instead saw '=='    eqeqeq
    greeter.ts(8,21): error TS2345: Argument of type ‘number[]’ is not assignable to parameter of type ‘string’.

Logic Unit Testing

Use Jest to unit test business logic decoupled from UI.

import React from "react";
import renderer from "react-test-renderer";
import App, { Counter, reducer } from "./App";

const list = ["a", "b", "c"];

describe("App", () => {
  describe("Reducer", () => {
    it("should set a list", () => {
      const state = { list: [], error: null };
      const newState = reducer(state, {
        type: "SET_LIST",
        list,
      });
      expect(newState).toEqual({ list, error: null });
    });
  });
  ...
});

Component Unit Testing

Use Jest to unit tests the component using different possible approaches.

Regression Testing with Snapshots

Use Jest Snapshots for regression testing of the output.

import React from "react";
import { render } from "@testing-library/react";
import LoginForm from "./LoginForm";

test("LoginForm should generate the correct HTML and CSS", () => {
  const onSubmit = jest.fn();

  const { asFragment } = render(<LoginForm onSubmit={onSubmit} />);
  expect(asFragment()).toMatchSnapshot();
});

Use Storybook with Storyshoots or Jest Image Snapshot for visual regression testing.

Behavior Testing with Testing Library

Use Testing Library to test the behavior of the components from the user point of view.

import React from "react";
import { render, fireEvent } from "@testing-library/react";
import LoginForm from "./LoginForm";

test("LoginForm should call the onSubmit callback", () => {
  const onSubmit = jest.fn();

  const { getByText } = render(<LoginForm onSubmit={onSubmit} />);
  fireEvent.click(getByText(/send/));
  expect(onSubmit).toHaveBeenCalled();
});

Integration Test for Complex Component

Use Cypress or TestCafe to test complex workflows as a real user, in a real browser with a fake backend and faking any HTTP call.

import { RequestMock } from "testcafe";
import { within, addTestCafeTestingLibrary } from "@testing-library/testcafe";

const loginAPIMock = RequestMock.onRequestTo(
  "http://localhost:3000/api",
).respond(null, 200);

fixture`Login`.beforeEach(addTestCafeTestingLibrary)
  .page`http://localhost:3000`.requestHooks(loginAPIMock);

test("fill login", async t => {
  const { getByLabelText, getByText } = await within("body");

  await t.typeText(getByLabelText(/email/), "test@test.com");
  await t.typeText(getByLabelText(/password/), "abc123");
  await t.click(getByText(/submit/));
  await t.expect(getByText(/success/).exists).ok();
});

End to End Tests for Complex Workflows

Use Cypress or TestCafe to test complex workflows as a real user, in a real browser with a real working backend.

import { within, addTestCafeTestingLibrary } from "@testing-library/testcafe";

fixture`Login`.beforeEach(addTestCafeTestingLibrary)
  .page`http://localhost:3000`;

test("fill login", async t => {
  const { getByLabelText, getByText } = await within("body");

  await t.typeText(getByLabelText(/email/), "test@test.com");
  await t.typeText(getByLabelText(/password/), "abc123");
  await t.click(getByText(/submit/));
  await t.expect(getByText(/success/).exists).ok();
});

Using tests, we don't have to be scared about deploying on Friday anymore 🥳.

Understanding Javascript at a low level

Did you ever ask yourself how Javascript works under the hood? It's important to understand how the language we're working with works on a lower level.

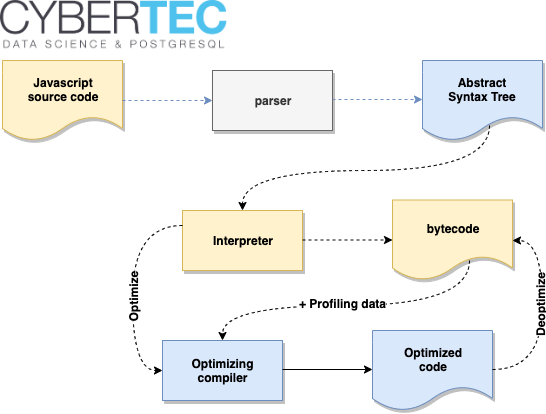
 Top level view of the Javascript engine

  • Receive source code
  • Parse the code and produce an Abstract Syntax Tree (AST)
  • Interpret as byte code and execute it
  • The profiler checks for optimisations at run-time
  • The compiler creates optimized code and replaces it with the byte code

Javascript Engine

What does the parser do?

Parser

A parser takes the source code and creates an AST. First, the parser splits the source code into tokens. There are different kinds of tokens, e.g. let and new are keywords, while + is an operator.

The tokens are then used to build the AST. If something unexpected is found, a SyntaxError is thrown.

A SyntaxError is thrown when the Javascript engine finds a piece of codes that don't belong to the language syntax.

Example

Let's try out the parser (using this website).

> var answer = 6 * 7;
[
    {
        "type": "Keyword",
        "value": "var"
    },
    {
        "type": "Identifier",
        "value": "answer"
    },
    {
        "type": "Punctuator",
        "value": "="
    },
    {
        "type": "Numeric",
        "value": "6"
    },
    {
        "type": "Punctuator",
        "value": "*"
    },
    {
        "type": "Numeric",
        "value": "7"
    },
    {
        "type": "Punctuator",
        "value": ";"
    }
]

 Abstract Syntax Tree (AST)

It's a graph (data structure) that represents a program.

It's used in:

  • Javascript Engine
  • Bundlers: Webpack, Rollup, Parcel
  • Transpilers: Babel
  • Linters: ESLint, Prettify
  • Type Checkers: Typescript, Flow
  • Syntax Highlighters

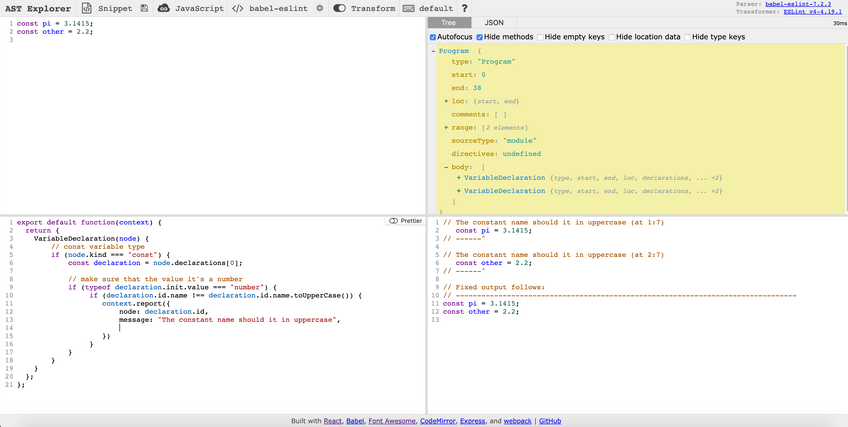
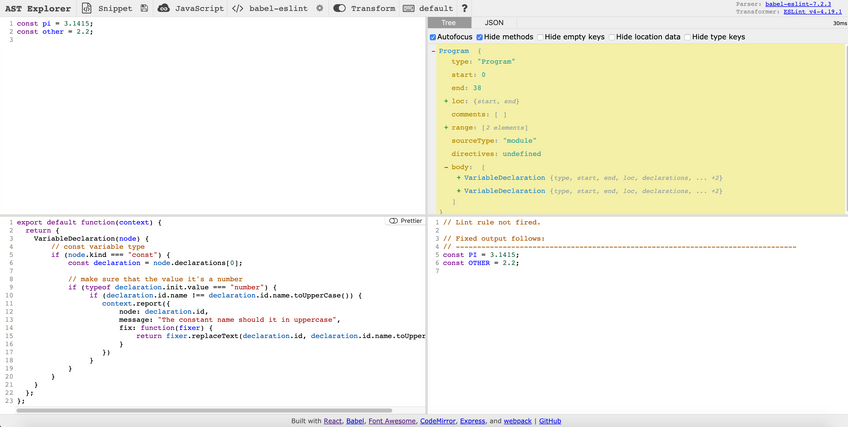
You can check the generated AST in the AST Explorer.

Below is an example on how to add an ESLint rule.

export default function(context) {
  return {
    VariableDeclaration(node) {
    	// const variable type
     	if (node.kind === "const") {
        	const declaration = node.declarations[0];
          	
          	// make sure that the value it's a number
          	if (typeof declaration.init.value === "number") {
            	 if (declaration.id.name !== declaration.id.name.toUpperCase()) {
                   	context.report({
                      	node: declaration.id,
                      	message: "The constant name should be in uppercase",
                      	fix: function(fixer) {
                         	return fixer.replaceText(declaration.id, declaration.id.name.toUpperCase()) 
                        }
                    })
                 }
            }
        }
    }
  };
};

 Example using AST to extend an ESLint rule without fix option

Example using AST to extend an ESLint rule without fix option

 Example using AST to extend an ESLint rule with fix option

Example using AST to extend an ESLint rule with fix option


Object preventExtension vs seal vs freeze

ECMAScript 5 introduced new Object methods to Javascript. Among them preventExtensions, seal, freeze methods will be compared to each other.

preventExtensions

An object called by this method can't have any new properties being added.

Example

let person = {
  name: "Agustin",
  age: 27,
};

Object.preventExtensions(person);
Object.isExtensible(person); // return false

person.surname = "Ramirez";
console.log(person.surname); // return undefined

person.name = "Maria";
console.log(person); // return { name: "Maria", age: 27 }

delete person.age;
console.log(person); // return { name: "Maria" }

seal

An object called by this method can not have any new properties being added or current properties deleted.

Example

let person = {
  name: "Agustin",
  age: 27,
};

Object.seal(person);
Object.isSealed(person); // return true

// In strict mode this will throw a `TypeError`
person.foo = "something";
console.log(person.foo); // return undefined

person.name = "Maria";
console.log(person); // return { name: "Maria", age: 27 }

delete person.age;
console.log(person); // return { name: "Maria", age: 27 }

Object.defineProperty(person, "name", {
  get: () => "Juan",
}); // Throw TypeError

console.log(person); // return { name: "Maria", age: 27 }

freeze

An object called by this method can not have any further changes done to it.

Example

let person = {
  name: "Agustin",
  age: 27,
};

Object.freeze(person);
Object.isFrozen(person); // return true

person.name = "Maria";
console.log(person); // return { name: "Agustin", age: 27 }

shallow only

All of these methods only work on object properties shallowly, meaning that just work with the direct property references.

let person = {
  name: "Agustin", // Prevented, Sealed and Frozen
  age: 27, // Prevented, Sealed and Frozen
  address: {
    // Un-prevented, un-sealed and un-frozen
    country: "Argentina", // Un-prevented, un-sealed and un-frozen
    city: "Corrientes", // Un-prevented, un-sealed and un-frozen
  },
};

Feature matrix

Feature default preventExtensions seal freeze
add new properties
remove existing properties
change existing property values

Pretty CSS Hack to debug layouts

  1. Create a new bookmark
  2. Add the following code to the bookmark URL:
    javascript: (function() {
	var elements = document.body.getElementsByTagName('*');
	var items = [];
	for (var i = 0; i < elements.length; i++) {
		if (elements[i].innerHTML.indexOf('* { background:#000!important;color:#0f0!important;outline:solid #f00 1px!important; background-color: rgba(255,0,0,.2) !important; }') != -1) {
			items.push(elements[i]);
		}
	}
	if (items.length > 0) {
		for (var i = 0; i < items.length; i++) {
			items[i].innerHTML = '';
		}
	} else {
		document.body.innerHTML +=
			'<style>* { background:#000!important;color:#0f0!important;outline:solid #f00 1px!important; background-color: rgba(255,0,0,.2) !important; }\
            * * { background-color: rgba(0,255,0,.2) !important; }\
            * * * { background-color: rgba(0,0,255,.2) !important; }\
            * * * * { background-color: rgba(255,0,255,.2) !important; }\
            * * * * * { background-color: rgba(0,255,255,.2) !important; }\
            * * * * * * { background-color: rgba(255,255,0,.2) !important; }\
            * * * * * * * { background-color: rgba(255,0,0,.2) !important; }\
            * * * * * * * * { background-color: rgba(0,255,0,.2) !important; }\
            * * * * * * * * * { background-color: rgba(0,0,255,.2) !important; }</style>';
	}
})();

To use it, just navigate to a website and click on the bookmark you defined.

The image below shows this website with the bookmark activated.

Screenshot of Cybertec Layout

You can use it on any page.

Ain't that cool? 😀

P.S.: Tested on Chrome and Firefox.

Check the official post and this Gist for more information.